How to Setup a Windows Server & VPN Over The Internet
Today’s world has become more complex and diverse as a result. Even with the advancements in technology, modern life still offers us plenty of challenges and opportunities. Without giving too much away, let’s take a look at how you can set up your operating system, virtual private network (VPN) service, Web hosting company, and other Virtual Private Network (VPN) servers to unhook yourself from prying Internet gawkers when you don’t want them online. Read on for more
information about these and other topics regarding setting up a virtual private network (VPN).
How to Setup a Windows Server & VPN Over
The Internet
Click Start, and then select All Programs. On a Windows 7 screen, click Windows Server Update. Click Add Application, and then select Windows Server Update. When the needed process is complete, click Install, and follow the on-screen instructions. When the install complete, Log into your Windows 7 system computer using your Microsoft account. Open the Windows Explorer, and then click the Windows app that you previously logged into. Click Start, and then select Settings. Click Remote Desktop, and then click Remote Desktop Services. If you want to use more than one account, right-click the account that you want to manage, and then click Add Account.
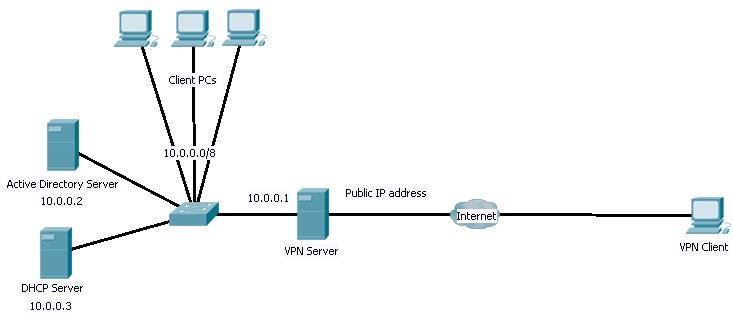
What services can be accessed over the VPN?
In the guestbook.config file of your Windows Server 2008 R2 or Windows 2008 or Windows 7 installation directory, select the following: Connector name=”virtual” description=”Virtual connectivity” action=”droppable ” > Connector type=”anguid” description=”Routing” action=” droppable ” > Connector name=”virtual” description=”VPN” action=” droppable ” > Connector type=”virtual” description=”User” action=” droppable ” > Connector name=”virtual” description=”Password” action=” droppable ” > Connector name=”virtual” description=”Hostname” action=” droppable ” > Connector name=”virtual” description=”RemoteIP” action=” droppable ” > Connector name=”virtual” description=”ServerIP” action=” droppable ” >
How to Use a Windows Server & VPN
To set up your server, you need to create an Active Directory Forest with the necessary details. You can do this by clicking Start, and then selecting Control Panel. Select Add Custom Forest, and then click forest. You can also right-click the existing Forest and select New Forest. On the New Forest page, select Properties, and then select Riverbeds, P2VPN, and Security. Click Add Forest, and then click Finish. When the process is complete, the new Forest should look like this: In the
guestbook.config file of the server, change the encryption type to RSA key verification, secret verification, and clients only.
Conclusion
The internet has become more complex with the advent of social media, internet communication, and the smartphone. To keep up with this, it is important to have a way to unplug the prying eyes of the world. Virtual Private Network services are a perfect way to do exactly that. The basics of virtual private network services are simple: you sign up for sessions, you establish a connection with the server, and you disconnect. If the connection with the server is successful, you log out and return to the internet where you can access the same service again normally. The services allow you to unplug online privacy threats while still keeping your online activities private.
 All Dedicated Servers
 USA Dedicated Server
 India Dedicated server
 Japan Dedicated Server
 Colombia Dedicated Server
 Italy Dedicated Server
 Turkey Dedicated Server
 Spain Dedicated Server
 Thailand Dedicated Server
 Greece Dedicated Server
 Norway Dedicated Server
 Finland Dedicated Server
 Taiwan Dedicated Server
 Australia Dedicated Server
 Germany Dedicated Server
 South korea Dedicated Server
 Hong Kong Dedicated Server
 Lithunia Dedicated Server
 Brazile Dedicated Servers
 UAE Dedicated Server
 RUSSIA VPS
 ISRAEL VPS
 Romania VPS
 MALAYSIA VPS
 Saudi Arabai VPS
 NETHERLAND VPS